Spring Security (6) SecurityContextHolder
Intro
이전 글에 이어서 Spring Security 의 인증(Authentication)에 대해서 공부해 보려고합니다.
Authentication
Spring Security 문서에 있는 인증에 대한 간단한 설명(링크)을 한 번 확인하고 가겠습니다.
Authentication is how we verify the identity of who is trying to access a particular resource. A common way to authenticate users is by requiring the user to enter a username and password. Once authentication is performed we know the identity and can perform authorization.
인증은 특정 리소스에 액세스하려는 사용자의 신원(identity)을 확인하는 방법입니다. 사용자를 인증하는 일반적인 방법은 사용자에게 사용자 이름과 비밀번호를 입력하도록 요청하는 것입니다. 인증이 수행되면 신원을 파악하고 권한 부여(authorization)를 수행할 수 있습니다.
앞서 글들에서 살펴봐서 알고 있는 것과 다른 내용은 없습니다.
Servlet Authentication Architecture
개별 내용을 먼저 볼까 하다가 문서 순서대로 보기로 결정했습니다.
Reactive Application이 아닌 Servlet Application 의 Authentication Architecture 임을 문서(링크)에서는 강조하고 싶었는지 Servlet Authentication Architecture 를 제목으로 하고 있습니다.
Servlet Application에서 Authentication 과정에 사용되는 주요 컴포넌트들을 아래와 같이 제시하고 있습니다.
SecurityContextHolder - The
SecurityContextHolderis where Spring Security stores the details of who is authenticated.SecurityContext - is obtained from the
SecurityContextHolderand contains theAuthenticationof the currently authenticated user.Authentication - Can be the input to
AuthenticationManagerto provide the credentials a user has provided to authenticate or the current user from theSecurityContext.GrantedAuthority - An authority that is granted to the principal on the
Authentication(i.e. roles, scopes, etc.)AuthenticationManager - the API that defines how Spring Security’s Filters perform authentication.
ProviderManager - the most common implementation of
AuthenticationManager.AuthenticationProvider - used by
ProviderManagerto perform a specific type of authentication.Request Credentials with
AuthenticationEntryPoint- used for requesting credentials from a client (i.e. redirecting to a log in page, sending aWWW-Authenticateresponse, etc.)AbstractAuthenticationProcessingFilter - a base
Filterused for authentication. This also gives a good idea of the high level flow of authentication and how pieces work together.
이전 글에서 봤던 다이어그램의 Start Authentication 테두리 내에 있던 컴포넌트들도 보입니다.
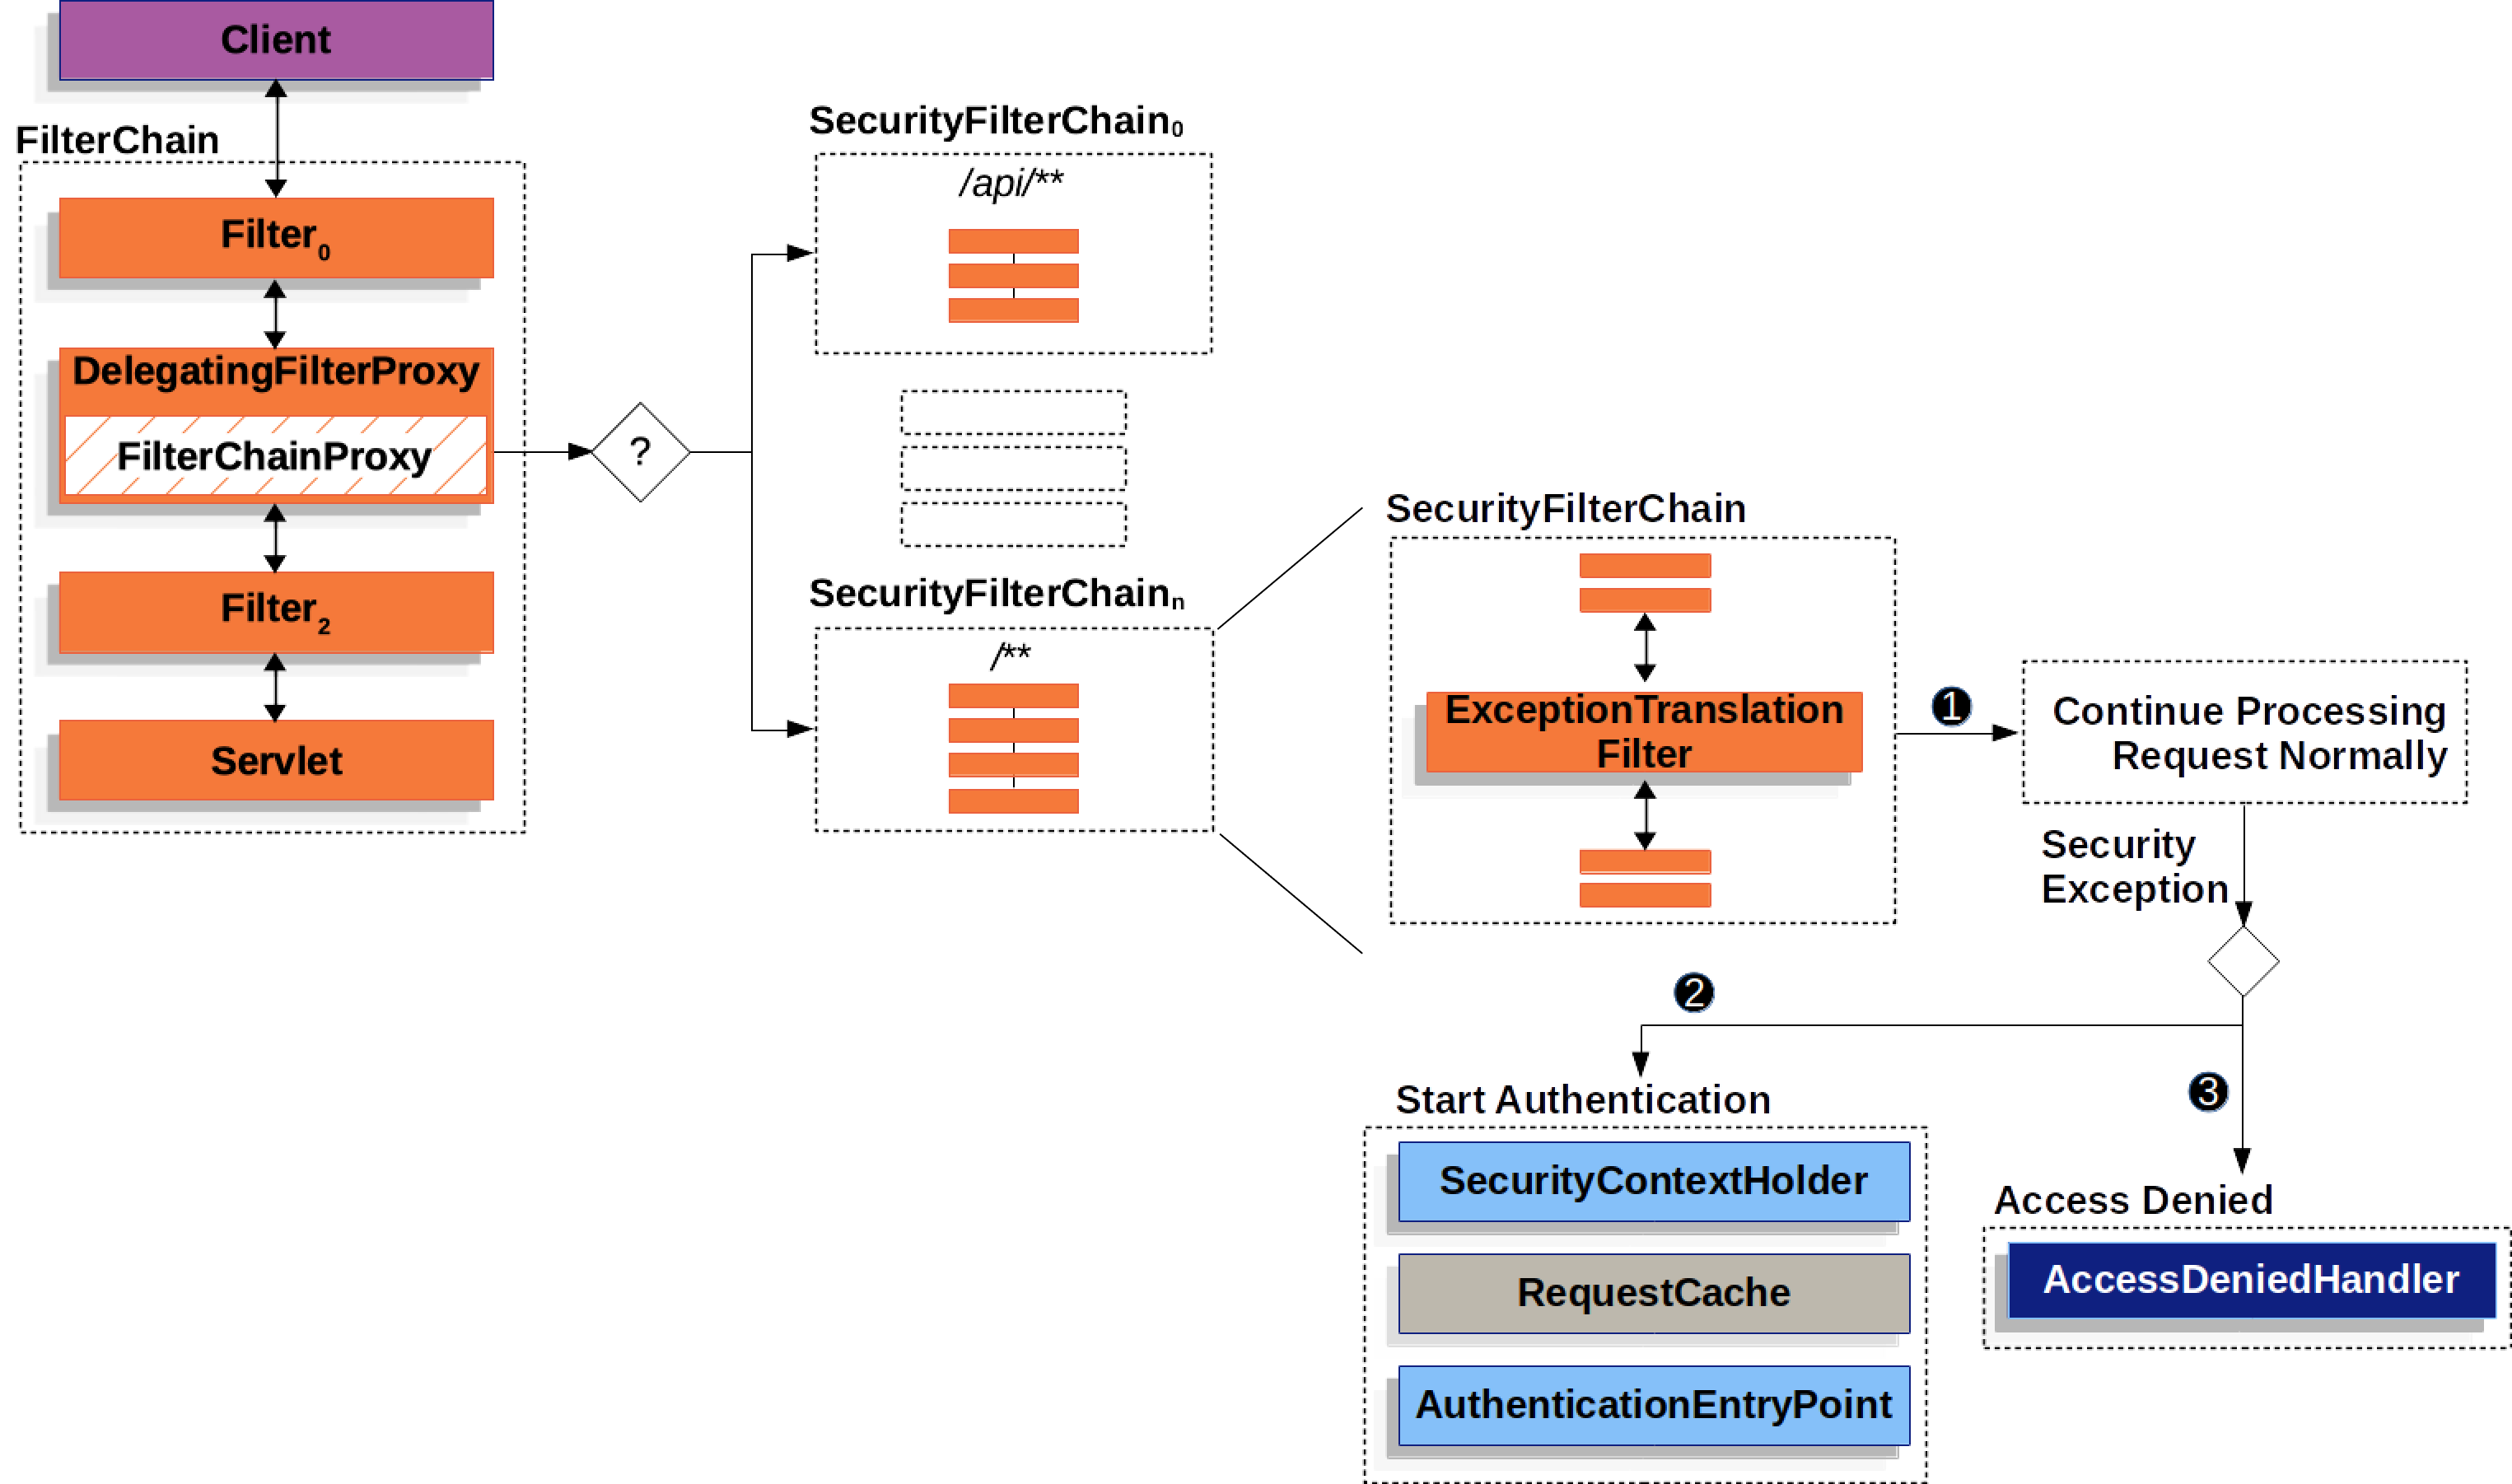
그런데 RequestCache는 주요 컴포넌트 측에는 못 끼는지 목록에도 없고, 지금 다시보니 색상도 다르다는게 눈에 들어옵니다. 다시 돌아갈 곳 저장하는 거니까 핵심 기능이라고 하기는 좀 애매하겠죠.
그럼 목록의 순서대로 SecurityContextHolder 부터 살펴보겠습니다.
SecurityContextHolder
위 목록에 간단히 써있던 SecurityContextHolder 의 설명을 다시 보겠습니다.
The
SecurityContextHolderis where Spring Security stores the details of who is authenticated
Spring Security가 인증된 사용자의 상세 정보를 저장하는 곳이라고 합니다.
그리고 이전 글에서 Log를 통해 본적이 있습니다.
1
2
3
4
5
6
7
[http-nio-8080-exec-2] TRACE o.s.s.w.a.w.BasicAuthenticationFilter - Found username 'user' in Basic Authorization header
[http-nio-8080-exec-2] TRACE o.s.s.w.c.HttpSessionSecurityContextRepository - No HttpSession currently exists
[http-nio-8080-exec-2] TRACE o.s.s.w.c.SupplierDeferredSecurityContext - Created SecurityContextImpl [Null authentication]
[http-nio-8080-exec-2] TRACE o.s.s.w.c.SupplierDeferredSecurityContext - Created SecurityContextImpl [Null authentication]
[http-nio-8080-exec-2] TRACE o.s.s.authentication.ProviderManager - Authenticating request with DaoAuthenticationProvider (1/1)
[http-nio-8080-exec-2] DEBUG o.s.s.a.d.DaoAuthenticationProvider - Authenticated user
[http-nio-8080-exec-2] DEBUG o.s.s.w.a.w.BasicAuthenticationFilter - Set SecurityContextHolder to UsernamePasswordAuthenticationToken [Principal=org.springframework.security.core.userdetails.User [Username=user, Password=[PROTECTED], Enabled=true, AccountNonExpired=true, credentialsNonExpired=true, AccountNonLocked=true, Granted Authorities=[]], Credentials=[PROTECTED], Authenticated=true, Details=WebAuthenticationDetails [RemoteIpAddress=0:0:0:0:0:0:0:1, SessionId=null], Granted Authorities=[]]
특히 위 Log 중에 마지막 Log를 통해 (Set SecurityContextHolder to UsernamePasswordAuthenticationToken) 사용자 정보를 저장하고 있는 것을 볼 수 있습니다.
코드를 살펴보면 UsernamePasswordAuthenticationToken의 상위 클래스인 AbstractAuthenticationToken의 toString() 메서드를 통해 Log 메시지를 출력하는 것을 확인할 수 있었습니다.
1
2
3
4
5
6
7
8
9
10
11
12
13
// AbstractAuthenticationToken.java
@Override
public String toString() {
    StringBuilder sb = new StringBuilder();
    sb.append(getClass().getSimpleName()).append(" [");
    sb.append("Principal=").append(getPrincipal()).append(", ");
    sb.append("Credentials=[PROTECTED], ");
    sb.append("Authenticated=").append(isAuthenticated()).append(", ");
    sb.append("Details=").append(getDetails()).append(", ");
    sb.append("Granted Authorities=").append(this.authorities);
    sb.append("]");
    return sb.toString();
}
그리고 Spring Security 문서에서는 이러한 정보를 다음과 같은 구조로 가지고 있음을 다이어그램으로 보여줍니다.
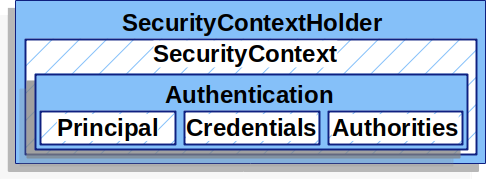
SecurityContextHolder 안에 SecurityContext가 있고, SecurityContext 안에 또 Authentication이 있고, Authentication 안에 앞서 본 상세 정보들이 있습니다.
그리고 이것이 만들어지는 것을 코드로 보면 아래와 같습니다.
1
2
3
4
5
6
SecurityContext context = SecurityContextHolder.createEmptyContext();
Authentication authentication =
    new TestingAuthenticationToken("username", "password", "ROLE_USER");
context.setAuthentication(authentication);

SecurityContextHolder.setContext(context);
순서대로 보자면 이렇습니다.
- SecurityContextHolder를 통해 비어있는 SecurityContext 생성
- Authentication 을 만들면서 Principal 은 “username”, Credentials 는 “password”, Authorities 는 “ROLE_USER” 로 설정
- SecurityContext에 Authentication 저장
- SecurityContextHolder에 SecurityContext 저장
앞서 Log에서 봤던 UsernamePasswordAuthenticationToken 대신 문서의 예제에서는 TestingAuthenticationToken이 있다고 보면 되겠습니다. 문서에서도 일반적인 시나리오에서는 UsernamePasswordAuthenticationToken 이 사용됨을 언급하고 있습니다.
그런데 이전 글에서 봤던 아래 Start Authentication 절차하고는 조금 다릅니다.
① 인증된 사용자 정보가 저장되는
SecurityContextHolder를 비우기②
RequestCache에 인증 성공 시 되돌아갈 HttpServletRequest 를 저장③ 로그인 페이지로 redirect 하거나 WWW-authenticate header 를 보내는 등 클라이언트로부터 인증 정보(credential)를 받기 위해
AuthenticationEntryPoint사용
Start Authentication 절차에서는 SecurityContextHolder 를 비워주는 것으로 되어있는데, 코드는 SecurityContextHolder 에서 비어있는 SecurityContext 를 만듭니다.
기억하실지 모르겠지만, 그 이유는 이전 글에서 봤던대로 Start Authentication 은 사용자가 인증되지 않았거나, AccessDeniedException 또는 AuthenticationException 이 던져졌을 때 수행되는 절차이기 때문입니다.
다시 Log를 소환해보면, BasicAuthenticationFilter 에서 SecurityContextHolder 에 UsernamePasswordAuthenticationToken 을 저장하고 있는 것을 볼 수 있습니다.
1
[http-nio-8080-exec-2] DEBUG o.s.s.w.a.w.BasicAuthenticationFilter - Set SecurityContextHolder to UsernamePasswordAuthenticationToken
다이어그램에서 Start Authentication 절차라 해서 봤던 것은 ExceptionTranslationFilter 였습니다.
BasicAuthenticationFilter
Spring Security에서 Username/Password 방식을 이용한 인증에는 Form, Basic, Digest 가 있습니다.
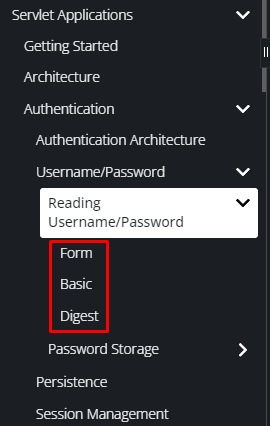
그 중에 살펴봐야 할 것은 BasicAuthenticationFilter 이름에도 써있어서 알 수 있는 Basic 입니다.
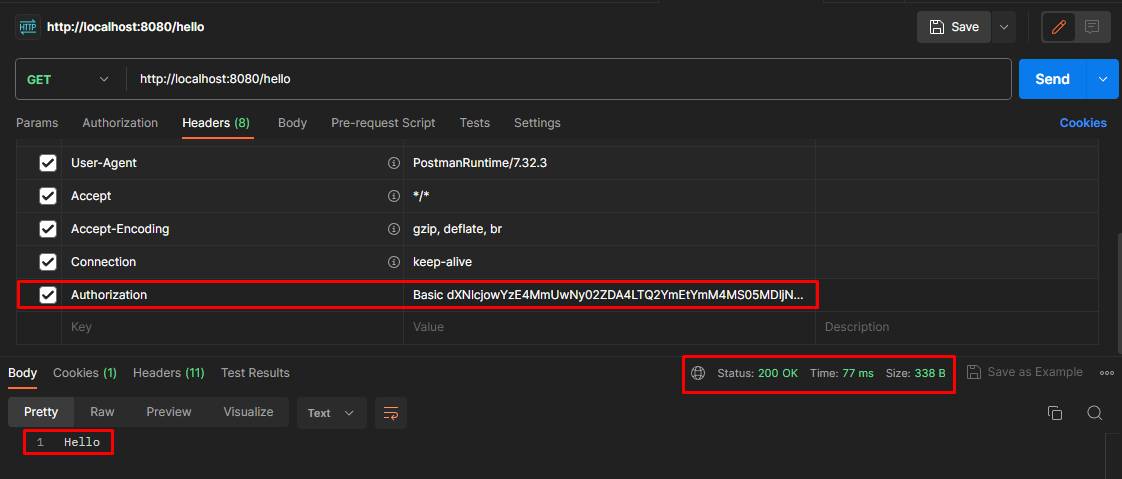
첫 번째 글에서 Authorization 헤더에 Basic 이라고 쓰고 공백을 하나둔 뒤에 Base64로 username:password 를 인코딩해서 보냈던 그 방식입니다.
지금 당장 자세히 다룰 것은 아니므로, 다이어그램만 간단하게 살펴보겠습니다.
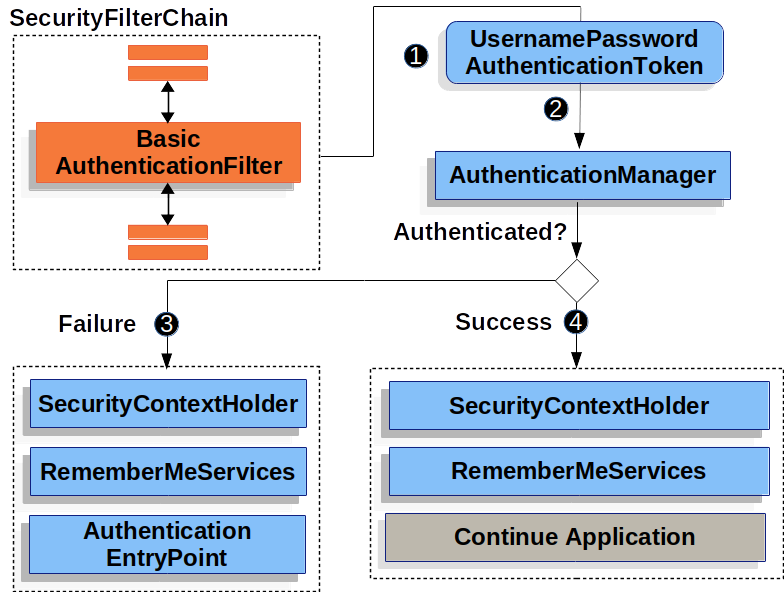
보시면 인증에 실패했을 때와 성공했을 때 모두 SecurityContextHolder 가 존재하는 것을 볼 수 있습니다. 그리고 문서의 각 설명에는 실패(Failure)했을 때는 첫 번째로 SecurityContextHolder를 비워주고, 성공(Success)했을 때는 첫 번째로 SecurityContextHolder에 Authentication을 저장한다고 적혀있습니다.
If authentication fails, then Failure.
- The SecurityContextHolder is cleared out.
If authentication is successful, then Success.
- The Authentication is set on the SecurityContextHolder.
하지만 우리는 앞서 살펴봤기 때문에 Success 일 때 SecurityContextHolder 에 바로 Authentication이 저장되는게 아니라, SecurityContext 에 저장된 후에 SecurityContext 가 SecurityContextHolder 에 저장되는 것을 알고 있죠.
BasicAuthenticationFilter 의 코드의 doFilterInternal() 메서드를 보면 아래와 같습니다. catch 블럭에서 AuthenticationException 을 잡은 후 this.securityContextHolderStrategy.clearContext(); 를 호출하면서 다이어그램에 나온 Failure 절차 대로 수행하고 있음을 알 수 있습니다.
1
2
3
4
5
6
7
8
9
10
11
12
13
14
15
16
17
18
19
20
21
22
23
24
25
26
27
28
29
30
31
32
33
34
35
36
37
38
39
40
41
42
@Override
protected void doFilterInternal(HttpServletRequest request, HttpServletResponse response, FilterChain chain)
        throws IOException, ServletException {
    try {
        UsernamePasswordAuthenticationToken authRequest = this.authenticationConverter.convert(request);
        if (authRequest == null) {
            this.logger.trace("Did not process authentication request since failed to find "
                    + "username and password in Basic Authorization header");
            chain.doFilter(request, response);
            return;
        }
        String username = authRequest.getName();
        this.logger.trace(LogMessage.format("Found username '%s' in Basic Authorization header", username));
        if (authenticationIsRequired(username)) {
            Authentication authResult = this.authenticationManager.authenticate(authRequest);
            SecurityContext context = this.securityContextHolderStrategy.createEmptyContext();
            context.setAuthentication(authResult);
            this.securityContextHolderStrategy.setContext(context);
            if (this.logger.isDebugEnabled()) {
                this.logger.debug(LogMessage.format("Set SecurityContextHolder to %s", authResult));
            }
            this.rememberMeServices.loginSuccess(request, response, authResult);
            this.securityContextRepository.saveContext(context, request, response);
            onSuccessfulAuthentication(request, response, authResult);
        }
    }
    catch (AuthenticationException ex) {
        this.securityContextHolderStrategy.clearContext();
        this.logger.debug("Failed to process authentication request", ex);
        this.rememberMeServices.loginFail(request, response);
        onUnsuccessfulAuthentication(request, response, ex);
        if (this.ignoreFailure) {
            chain.doFilter(request, response);
        }
        else {
            this.authenticationEntryPoint.commence(request, response, ex);
        }
        return;
    }

    chain.doFilter(request, response);
}
이전 글에서 BasicAuthenticationFilter 이후에 Log가 안나와도 나머지 Filter가 호출되는거라 생각했었는데 아니었습니다.
Debugger 를 통해 확인하니 this.ignoreFailure 는 false 로 설정되어 있어서 다음 Filter는 호출되지 않는 것을 볼 수 있습니다.

혹시나 runtime 에 값이 바뀌나 궁금해서 Debugger로 확인한건데 아니었습니다.
GET /Error 가 호출됐을 때 ExceptionTranslationFilter 가 호출된 것을 제가 착각한 것으로 보입니다.
간단하게 보고 넘어가려고 했는데, 어쩌다 보니 길어졌습니다. BasicAuthenticationFilter 는 나중에 별도로 자세히 다시 다뤄보도록 하겠습니다.
정리해보자면 Spring Security 공식 문서의 Authentication Architecture 에서 시작하면서 다룬 SecurityContextHolder 를 초기화하는 절차는 인증이 성공했을 때의 절차임을 나타냅니다.
그럼 SecurityContextHolder 는 뭘 하는 걸까?
지금까지 본 결과로는 SecurityContextHolder 는 정보를 저장하는 거 말고는 딱히 하는 일이 없어보입니다.
공식 문서 설명에 SecurityContextHolder 에 대해 이런 설명이 있습니다.
Spring Security does not care how the
SecurityContextHolderis populated. If it contains a value, it is used as the currently authenticated user.
Spring Security 는 SecurityContextHolder 에 값이 있으면 현재 인증된 사용자로 사용하고, 어떤 값으로 채워지든 상관 안한다고 합니다.
그런데 실제 값을 갖고 있는 건 SecurityContext 입니다. 더 정확히 말하자면 Authentication 입니다.
그럼 SecurityContextHolder 는 이름 그대로 Holder 역할 밖에 안하는가 싶지만, SecurityContextHolder 문서(링크)를 보면 첫 줄에 이렇게 나옵니다.
Associates a given
SecurityContextwith the current execution thread.
번역해보자면 ‘주어진 SecurityContext를 현재 실행 스레드와 연결합니다.’ 인데, Associates 를 연결한다고 번역하는게 좀 어색한 느낌이 들기는 합니다. thread 에 대해 지식이 부족해서 자연스럽게 번역이 안되는 느낌입니다.
아쉬우니 조금 더 보면 아래와 같습니다.
This class provides a series of static methods that delegate to an instance of SecurityContextHolderStrategy. The purpose of the class is to provide a convenient way to specify the strategy that should be used for a given JVM. This is a JVM-wide setting, since everything in this class is static to facilitate ease of use in calling code.
‘이 클래스의 목적은 주어진 JVM에 사용해야 하는 전략을 편리하게 지정할 수 있는 방법을 제공하는 것입니다.’ 라고 SecurityContextHolder 의 목적을 말해주고 있습니다.
일련의 static 메서드를 SecurityContextHolderStrategy 인스턴스에 위임한다고도 하는데, 앞서 BasicAuthenticationFilter 에서 this.securityContextHolderStrategy.clearContext(); 를 호출하는 것을 봐서 알 수 있습니다.
뭔가 thread 관련해서 일을 하는 것 같은 감은 오는데, 뭔가 아쉬운 기분이들어서 조금 더 보겠습니다.
다시 Spring Security 공식 문서에서 보여줬던 코드를 보겠습니다.
1
2
3
4
5
6
SecurityContext context = SecurityContextHolder.createEmptyContext();
Authentication authentication =
    new TestingAuthenticationToken("username", "password", "ROLE_USER");
context.setAuthentication(authentication);

SecurityContextHolder.setContext(context);
위 코드 중에 첫 번째 줄(SecurityContext context = SecurityContextHolder.createEmptyContext(); )에 대한 문서에서의 설명은 아래와 같습니다.
먼저 빈 SecurityContext를 생성합니다. 멀티 스레드(multiple threads)에서 경합 조건(race condition)을 피하려면 SecurityContextHolder.getContext().setAuthentication(authentication)을 사용하는 대신 새 SecurityContext 인스턴스를 생성해야 합니다.
설명 상으로 추측해보자면 멀티 스레드 환경에서 SecurityContext 에 저장된 값이 예측할 수 없게 되는 문제가 있을 수 있고, 이를 해결하기 위해 SecurityContextHolder 가 필요한 것으로 판단됩니다.
조금 더 자세히 이해하려면 race condition 에 대해 간단하게라도 살펴봐야 할 것 같습니다.
race condition
제가 어설프게 설명하는 것 보다는 GPT-3.5 가 요약한 내용이 더 좋은 것 같아 그대로 붙여넣습니다.
race condition에 대해 간단한 설명을 드리겠습니다.
Race condition은 동시에 여러 프로세스 또는 스레드가 공유 자원에 접근하고 수정하는 상황에서 발생할 수 있는 문제입니다. 이러한 상황에서는 실행 순서나 타이밍에 따라 결과가 달라질 수 있습니다.
예를 들어, 한 자원을 동시에 수정하는 두 개의 스레드가 있다고 가정해 봅시다. 첫 번째 스레드는 값을 증가시키고, 두 번째 스레드는 값을 감소시키는 작업을 수행합니다. 그러나 스레드의 실행 순서나 타이밍에 따라 결과가 달라질 수 있습니다.
만약 첫 번째 스레드가 값을 증가시킨 후 두 번째 스레드가 값을 감소시키기 전에 실행되었다면, 예상과는 다른 결과가 나타날 수 있습니다. 예를 들어, 기대한 값보다 작은 값을 얻을 수도 있습니다.
이러한 문제를 방지하기 위해서는 스레드들 사이의 동기화를 제공하는 방법을 사용해야 합니다. 동기화는 스레드 간의 실행 순서를 조정하거나 공유 자원에 대한 접근을 제한하여 race condition을 방지합니다. 일반적으로 동기화 기법은 상호배제(mutual exclusion)를 제공하고, 한 번에 하나의 스레드만이 공유 자원에 접근할 수 있도록 합니다.
동기화 기법으로는 락(lock)이나 세마포어(semaphore) 등이 있으며, 프로그래밍 언어 또는 운영체제에서 제공하는 동기화 기능을 사용할 수도 있습니다. 이러한 동기화 기법을 올바르게 사용하여 race condition을 피하고, 안정적인 프로그램 실행을 보장할 수 있습니다.
문서를 읽어 나가기에는 ‘스레드의 실행 순서나 타이밍에 따라 결과가 달라질 수 있다’는 점이 가장 핵심이지 않을까 싶습니다.
Spring Security에 맞게 예제를 생각해보겠습니다. 한 스레드가 인증 정보를 저장하는 과정에 있는데, 인증 정보를 요청하는 다른 스레드가 먼저 실행돼서 인증되지 않은 것으로 처리되는 등의 문제가 있을 수 있을 것 같습니다. 물론 직접 확인해보지는 않아서 이런 일이 없게 잘 만들어놨을지도 모르겠습니다. 믿을만한 예시가 발견되면 추가하겠습니다.
Spring Secuirty 공식 문서 살펴보기
Spring Security 공식 문서에서는 이에대한 추가적인 설명이 있습니다. 문서에 있는 설명을 번역기로 번역한 결과를 아래 붙여넣었습니다.
기본적으로 SecurityContextHolder는 ThreadLocal을 사용하여 이러한 세부 정보를 저장하는데, 이는 SecurityContext가 해당 메서드에 명시적으로 인수로 전달되지 않더라도 동일한 스레드의 메서드에서 항상 SecurityContext를 사용할 수 있음을 의미합니다. 이러한 방식으로 ThreadLocal을 사용하는 것은 현재 주체의 요청이 처리된 후 스레드를 지우는 데 주의를 기울이면 매우 안전합니다. Spring Security의 FilterChainProxy는 SecurityContext가 항상 지워지도록 보장합니다.
일부 애플리케이션은 스레드를 사용하는 특정 방식 때문에 ThreadLocal을 사용하기에 완전히 적합하지 않습니다. 예를 들어, Swing 클라이언트는 Java 가상 머신의 모든 스레드가 동일한 보안 컨텍스트를 사용하기를 원할 수 있습니다. 시작 시 보안 컨텍스트 저장 방법을 지정하는 전략으로 SecurityContextHolder를 구성할 수 있습니다. 독립 실행형 애플리케이션의 경우 SecurityContextHolder.MODE_GLOBAL 전략을 사용합니다. 다른 애플리케이션의 경우 보안 스레드에 의해 생성되는 스레드도 동일한 보안 ID를 가정하도록 할 수 있습니다. 이를 위해 SecurityContextHolder.MODE_INHERITABLETHREADLOCAL을 사용할 수 있습니다. 두 가지 방법으로 기본 SecurityContextHolder.MODE_THREADLOCAL에서 모드를 변경할 수 있습니다. 첫 번째는 시스템 속성을 설정하는 것입니다. 두 번째는 SecurityContextHolder에서 정적 메서드를 호출하는 것입니다. 대부분의 애플리케이션은 기본값에서 변경할 필요가 없습니다. 그러나 변경해야 하는 경우 SecurityContextHolder에 대한 JavaDoc을 참조하여 자세한 내용을 알아보세요.
요약하자면, ‘웹 개발하면서 변경할 일은 별로 없다.’고 할 수 있겠습니다. 그 별로 없는 경우가 궁금하긴 하지만, Spring Security 흐름을 살펴보고 있는 지금 과정에서 집중해야 할 부분은 아니라고 생각돼서 필요할 때 찾아보는 걸로 해야겠습니다.
간단하게 ThreadLocal이 뭔지만 살펴보고 끝내는게 좋겠습니다.
ThreadLocal 의 Java 문서(링크)에 있는 설명하고, GPT-3.5 설명을 비교해보니 GPT-3.5 설명이 길지만 이해하기는 더 쉬운 것 같아 아래 붙여넣습니다.
ThreadLocal 설명 by GPT-3.5
ThreadLocal은 자바에서 스레드 간에 데이터를 공유하지 않고 각 스레드에게 독립적인 값을 제공하는 클래스입니다. 각 스레드에 대해 별도의 변수 인스턴스를 제공하여 동시성 문제와 관련된 문제를 해결할 수 있습니다.
ThreadLocal은 스레드로컬 변수(Thread-local variables)라고도 불리며, 주로 멀티스레드 환경에서 스레드 간의 데이터 공유를 피하고 스레드 안전성을 유지하기 위해 사용됩니다.
ThreadLocal은 다음과 같은 특징을 가지고 있습니다:
- 각 스레드에 대해 독립적인 변수 인스턴스를 생성합니다. 즉, 각 스레드는 자신만의 변수 값을 가집니다.
- 스레드 간에 데이터 공유가 아니므로, 스레드 간의 동기화 없이 안전하게 사용할 수 있습니다.
- ThreadLocal 변수에 저장된 데이터는 해당 스레드에서만 접근할 수 있으며, 다른 스레드에서는 접근할 수 없습니다.
ThreadLocal의 주요 메서드는 다음과 같습니다:
get(): 현재 스레드에 대한 변수 값을 반환합니다.set(): 현재 스레드에 대한 변수 값을 설정합니다.remove(): 현재 스레드의 변수 값을 제거합니다.initialValue(): 변수의 초기값을 설정하는 메서드입니다. 필요한 경우 이 메서드를 오버라이드하여 초기값을 설정할 수 있습니다.
ThreadLocal의 사용 예시로는 스레드 풀(Thread Pool)이나 웹 요청 처리와 같은 멀티스레드 환경에서 사용자 세션 정보, 트랜잭션 컨텍스트, 로깅 정보 등을 스레드로컬 변수로 저장할 수 있습니다. 이를 통해 각각의 스레드에서 필요한 데이터에 접근할 수 있고, 동시성 문제 없이 안전하게 처리할 수 있습니다.
예를 들어, 다음은 스레드로컬 변수를 사용하여 사용자 세션 정보를 저장하고 접근하는 예시입니다:
1
2
3
4
5
6
7
8
9
10
11
12
13
14
15
public class UserSession {
    private static ThreadLocal<User> userThreadLocal = new ThreadLocal<>();

    public static void setUser(User user) {
        userThreadLocal.set(user);
    }

    public static User getUser() {
        return userThreadLocal.get();
    }

    public static void clearUser() {
        userThreadLocal.remove();
    }
}
위의 예시에서 UserSession 클래스는 userThreadLocal라는 ThreadLocal 변수를 사용하여 현재 스레드에 대한 사용자 정보를 저장합니다. setUser() 메서드를 사용하여 사용자 정보를 설정하고, getUser() 메서드를 사용하여 현재 스레드에 대한 사용자 정보를 가져올 수 있습니다. clearUser() 메서드는 사용자 정보를 제거합니다.
이렇게 하면 각 스레드가 자신의 사용자 정보를 독립적으로 관리하며, 스레드 간의 데이터 공유와 관련된 문제를 해결할 수 있습니다.
정리
SecurityContextHolder 는 SecurityContext 에 대한 Holder 로서의 역할 뿐만 아니라, SecurityContext 에 저장된 값을 사용할 때 멀티 스레드 관련 문제가 생기지 않도록 보조하는 역할을 합니다.
궁금하신 분들은 SecurityContextHolder 의 코드(github 링크)를 직접 보시는 것도 좋겠습니다.
Outro
그냥 뭣도모르고 만들기만 하면서 봤던 클래스들이 조금씩 보이기 시작하니까 반가운 기분이듭니다.
그런데 잘못 생각하고, 잘못 작성했던 글도 발견되고 있어 걱정입니다. 개인적으로는 잘못알고 있던거 알아내서 좋은데, 혹시나 다른 분이 잘못된 정보를 진실로 믿어버릴까 걱정입니다. 공부하고 수정하는게 최선의 방법이라 생각하면서 일단 계속 달려봐야겠습니다.
그럼 다음에도 문서의 내용 순서대로 이어서 SecurityContext, Authentication 등 순서대로 보겠습니다.