Spring Boot 로 REST API 만들어보기 (1) 회원가입
Intro
REST API를 만들어보고 싶던 찰나에, 타이밍 좋게 원티드에서 프리온보딩 백엔드 인턴십(링크) 참가인원 선발용 사전과제로 REST API를 만드는 과제가 주어졌습니다.
워낙 잘 하시는 분들이 많아서 선발될지는 모르겠지만, 뭔가 목표가 있는 상태에서 만들어보는게 의욕도 생기고 더 좋은 것 같습니다.
VMware 에서 운영하는 Spring Academy 의 Building a REST API with Spring Boot 강의(링크)에 나온 내용을 따라서 적용해볼 계획입니다. Spring을 배우긴 했는데 REST API 시작도 못하고 있는 분들께 추천드립니다.
글은 두서 없이 제작과정을 쓰고싶은 것만 그냥 쭉 써볼 계획이라, 코드를 보고싶으신 분은 Github 링크를 참고해주세요.
요구사항
아래는 과제 Github(링크)에 있는 요구사항 입니다.
게시판을 관리하는 RESTful API를 개발해 주세요. 이때, 다음의 기능을 구현해야 합니다. 데이터베이스의 테이블 설계는 지원자분의 판단에 맡겨져 있습니다. 요구사항을 충족시키는 데 필요하다고 생각되는 구조로 자유롭게 설계해 주세요.
- 과제 1. 사용자 회원가입 엔드포인트
- 이메일과 비밀번호로 회원가입할 수 있는 엔드포인트를 구현해 주세요.
- 이메일과 비밀번호에 대한 유효성 검사를 구현해 주세요.
- 이메일 조건: @ 포함
- 비밀번호 조건: 8자 이상
- 비밀번호는 반드시 암호화하여 저장해 주세요.
- 이메일과 비밀번호의 유효성 검사는 위의 조건만으로 진행해 주세요. 추가적인 유효성 검사 조건은 포함하지 마세요.
- 과제 2. 사용자 로그인 엔드포인트
- 사용자가 올바른 이메일과 비밀번호를 제공하면, 사용자 인증을 거친 후에 JWT(JSON Web Token)를 생성하여 사용자에게 반환하도록 해주세요.
- 과제 1과 마찬가지로 회원가입 엔드포인트에 이메일과 비밀번호의 유효성 검사기능을 구현해주세요.
- 과제 3. 새로운 게시글을 생성하는 엔드포인트
- 과제 4. 게시글 목록을 조회하는 엔드포인트
- 반드시 Pagination 기능을 구현해 주세요.
- 과제 5. 특정 게시글을 조회하는 엔드포인트
- 게시글의 ID를 받아 해당 게시글을 조회하는 엔드포인트를 구현해 주세요.
- 과제 6. 특정 게시글을 수정하는 엔드포인트
- 게시글의 ID와 수정 내용을 받아 해당 게시글을 수정하는 엔드포인트를 구현해 주세요.
- 게시글을 수정할 수 있는 사용자는 게시글 작성자만이어야 합니다.
- 과제 7. 특정 게시글을 삭제하는 엔드포인트
- 게시글의 ID를 받아 해당 게시글을 삭제하는 엔드포인트를 구현해 주세요.
- 게시글을 삭제할 수 있는 사용자는 게시글 작성자만이어야 합니다.
REST API
제가 봤던 REST API와 관련한 설명은 대체로 실제와는 잘 매칭이 안되는 경우가 많은데, 강의에서는 저한테 잘 와닿는 설명이라 좋았습니다.
Let’s start with a concise definition of REST: Representational State Transfer. In a RESTful system, data objects are called Resource Representations. The purpose of a RESTful API (Application Programming Interface) is to manage the state of these Resources.
Said another way, you can think of “state” being “value” and “Resource Representation” being an “object” or “thing”. Therefore, REST is just a way to manage the values of things. Those things might be accessed via an API, and are often stored in a persistent data store, such as a database.
RESTful 시스템에서 데이터 객체를 Resource Representations라 하는데, 이 Resource 의 상태, 즉, 객체의 값을 관리하는게 REST(Representational State Transfer) 입니다.
위 내용이 나온 강의 페이지 링크
데이터베이스 테이블 설계
erdcloud를 계속 사용했었는데, dbdiagram.io를 한 번 써보고 싶어서 사용해봤습니다.

다이어그램(링크)
글(posts)을 작성하지 않은 사용자(users)가 있을 수 있는데, dbdiagram은 표기할 방법이 없습니다. 그림이 깔끔해서 마음에 들기는 한데 crow’s foot 표기법을 세세하게 지원하지는 않아서 아쉽습니다.
email은 링크의 문서를 근거로 255 characters 로 정했습니다. email의 최대 길이는 254 characters 임을 설명하고 있습니다.
현실적으로 이렇게 길게 email 주소를 사용하는 경우를 찾아보기는 힘들 뿐더러, 판단 기준이 없었다면 흔히 사용하는 길이를 255 로 설정했을 것이기 때문에 문서의 신빙성을 굳이 따져보진 않았습니다.
password
비밀번호는 해싱되어 저장되므로, 해싱 알고리즘에 따라 길이가 달라질 수 있습니다. 해싱 알고리즘을 모두 검토할 시간은 없어서 일반적으로 많이 사용되는 bcrypt 를 사용할 예정이며, bcrypt의 최대 길이를 검색해보니 최대 72 characters 입니다. 그래서 일반적으로 email과 마찬가지로 일반적으로 사용되는 255로 설정했습니다.
왜 VARCHAR 에서 255를 일반적으로 설정하는지 자료만 쌓아두고 정리를 안하고 있는데, 한 번 정리를 해야겠습니다.
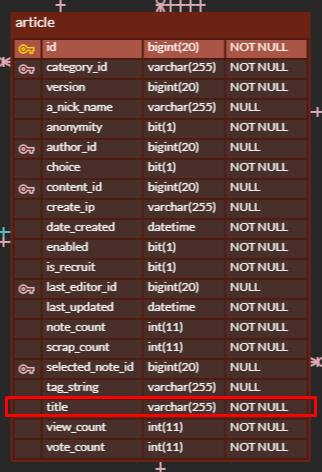
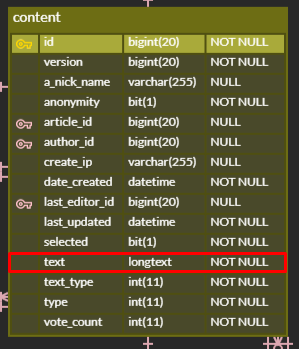
title, content
title 은 VARCHAR(255), content 는 LONGTEXT로 지정했습니다. 이는 기획에 따라 달라질 수 있기 때문에, 무엇을 설정하든 큰 의미가 없을 것 같아 erdcloud 에 있는 OKKY의 테이블(링크)을 참고하여 설정했습니다.
created_at, updated_at
사용자 회원가입, 게시글 생성/수정 시점을 기록하기 위해 추가하였습니다.
기타
조회수 등을 추가하고싶은데, 유효성 검사도 정해진 것만 하라고 적혀있는 것을 보면 현재 요구사항을 만족할 만큼만 하라는 것 같아서 추가하지 않았습니다.
가산점 받을 수 있는 8월 6일을 개인적인 마감일로 정한 상태라, 시간적 여유가 있으면 물어보고 추가하는게 좋겠습니다.
기술 스택
제약사항
주어진 기술 제약사항은 아래와 같습니다.
- Python/Flask, Python/Django, JavaScript/Express, Java/Spring Boot 중 택1
- MySQL 8.0
당연히 공부해왔던 Java/Spring Boot 를 택하고, MySQL 8.0 은 사용하던거라 편하게 됐습니다.
기술 선택
시간이 많이 없기 때문에, 써봤던 것과 써보고 싶었던 것 중 써볼만 하겠다 싶은 것들을 적당히 섞어봤습니다.
- Spring Data JPA
- Spring Security
- JUnit 5
- Lombok
- H2
- Validation
Spring Data JPA는 좀 오버일 수도 있기는 한데, 언제 또 써보겠나 싶어서 추가했습니다.
Spring Security 는 그래도 좀 써봐서 인증, 인가 시에 편하게 할 수 있을 것 같습니다. JUnit 5는 Spring Boot 사용하면 자동으로 따라오기도 하고, 그나마 사용할 수 있는 테스트용 라이브러리입니다.
나머지 Lombok 은 보일러플레이트 제거용, H2 는 테스트용, Validation 은 유효성 검사용으로 추가했습니다.
과제 1. 사용자 회원가입 엔드포인트
Intro에서 언급했던 강의의 개발 사이클을 따라 테스트 먼저 작성 후에 구현을 하는 방식으로 진행해보겠습니다. 강의에서 배운 방식은 TDD의 Red-Green-Refactor 사이클이라고 합니다. 실패하는 테스트를 만들고, 테스트를 통과할 수 있는 구현을 하고, 리팩터링을 합니다.
먼저 회원가입을 하려면 회원정보를 저장할 객체가 필요하므로 UserAccount 객체부터 시작합니다. JPA 를 사용하니까 테이블이 되기도 하겠습니다.
UserAccount - Red
평소 하던 것과 달라 뭔가 불편한 마음이 들지만, 강의를 따라서, 있지도 않은 UserAccount 객체를 사용한 테스트를 먼저 추가합니다.
1
2
3
4
5
6
7
8
9
10
11
12
13
14
15
16
17
18
19
20
21
22
23
24
25
26
27
28
29
30
31
32
33
34
35
36
37
38
39
40
package com.limvik.wantedpreonboardingbackend;

import com.limvik.wantedpreonboardingbackend.domain.UserAccount;
import org.junit.jupiter.api.Test;
import org.springframework.beans.factory.annotation.Autowired;
import org.springframework.boot.test.autoconfigure.json.JsonTest;
import org.springframework.boot.test.json.JacksonTester;

import java.io.IOException;
import java.time.LocalDateTime;

import static org.assertj.core.api.Assertions.assertThat;

@JsonTest
public class UserAccountTests {
    @Autowired
    private JacksonTester<UserAccount> json;

    @Test
    public void userAccountSerializationTest() throws IOException {
        UserAccount userAccount = new UserAccount(
                1L,
                "limvik@limvik.com",
                "password",
                LocalDateTime.of(2023, 8, 1, 0, 0, 0));
        assertThat(json.write(userAccount)).isStrictlyEqualToJson("user_account.json");
        assertThat(json.write(userAccount)).hasJsonPathNumberValue("@.id");
        assertThat(json.write(userAccount)).extractingJsonPathNumberValue("@.id")
                .isEqualTo(1);
        assertThat(json.write(userAccount)).hasJsonPathStringValue("@.email");
        assertThat(json.write(userAccount)).extractingJsonPathStringValue("@.email")
                .isEqualTo("limvik@limvik.com");
        assertThat(json.write(userAccount)).hasJsonPathStringValue("@.password");
        assertThat(json.write(userAccount)).extractingJsonPathStringValue("@.password")
                .isEqualTo("password");
        assertThat(json.write(userAccount)).hasJsonPath("@.createdAt");
        assertThat(json.write(userAccount)).extractingJsonPathStringValue("@.createdAt")
                .isEqualTo("2023-08-01T00:00:00");
    }
}
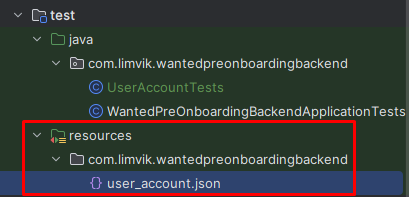
그리고 아래와 같이 user_account.json 를 추가해줍니다.
1
2
3
4
5
6
{
  "id": 1,
  "email": "limvik@limvik.com",
  "password": "password",
  "createdAt": "2023-08-01T00:00:00"
}
json 파일은 아래와 같은 경로에 있어야 합니다. com 부터는 각자 설정한 값에 따라 달라집니다.
src/test/resources/com/limvik/wantedpreonboardingbackend
그리고 실행시켜보면, 당연하게도 클래스를 찾을 수 없어서 오류가 발생합니다.
1
2
3
4
    private JacksonTester<UserAccount> json;
                          ^
  symbol:   class UserAccount
  location: class UserAccountTest
UserAccount - Green
이제 필요한 UserAccount 클래스를 만들어줍니다.
1
2
3
4
5
6
7
8
9
10
11
12
13
14
15
16
17
18
19
20
21
22
23
24
25
26
package com.limvik.wantedpreonboardingbackend.domain;

import jakarta.persistence.*;
import lombok.*;
import org.hibernate.annotations.CreationTimestamp;

import java.time.LocalDateTime;

@AllArgsConstructor
@NoArgsConstructor
@Data
@Entity
public class UserAccount {
    @Id
    @GeneratedValue(strategy = GenerationType.IDENTITY)
    private Long id;

    @Column(nullable = false, unique = true)
    private String email;

    @Column(nullable = false)
    private String password;

    @CreationTimestamp
    private LocalDateTime createdAt;
}
그리고 다시 테스트를 수행해보면, 통과가 되는 것을 볼 수 있습니다.
1
UserAccountTests > userAccountSerializationTest() PASSED
PASSED를 보고 싶어서 ./gradlew test 명령어로 터미널에서 실행시켰습니다.
PASSED 보려면 build.gradle 에 아래와 같이 추가하고, 입맛에 맞게 수정해주시면 됩니다. 강의에 있는 설정입니다.
1
2
3
4
5
6
7
8
9
10
11
12
13
test {
	testLogging {
		events "passed", "skipped", "failed"

		showExceptions true
		exceptionFormat "full"
		showCauses true
		showStackTraces true

		// Change to `true` for more verbose test output
		showStandardStreams = false
	}
}
Deserialization 용 테스트 코드도 작성해서 한 번은 FAILED, 한 번은 PASSED 되도록 합니다. 값만 바꿔가면서 하면 되므로, 여기에 과정을 모두 적는건 무의미한 것 같아 코드만 추가합니다.
1
2
3
4
5
6
7
8
9
10
11
12
13
14
15
16
17
18
19
20
21
22
23
@Test
public void userAccountDeserializationTest() throws IOException {
    String expected = """
            {
              "id": 1,
              "email": "limvik@limvik.com",
              "password": "password",
              "createdAt": "2023-08-01T00:00:00"
            }
            """;
    assertThat(json.parse(expected))
            .isEqualTo(new UserAccount(
                    1L,
                    "limvik@limvik.com",
                    "password",
                    LocalDateTime.of(2023, 8, 1, 0, 0, 0)));

    assertThat(json.parseObject(expected).getId()).isEqualTo(1L);
    assertThat(json.parseObject(expected).getEmail()).isEqualTo("limvik@limvik.com");
    assertThat(json.parseObject(expected).getPassword()).isEqualTo("password");
    assertThat(json.parseObject(expected).getCreatedAt())
            .isEqualTo(LocalDateTime.of(2023, 8, 1, 0, 0, 0));
}
사용자 계정 정보를 JSON과 POJO로 변환하는 데 문제 없을거라는 확신이 생깁니다.
능력의 한계로 아직 리팩터링 할게 보이지 않으므로, 다음으로 넘어가 회원가입 엔드포인트를 만듭니다.
회원가입 엔드포인트 - 테스트 작성 시작
회원가입은 회원정보를 서버에 저장해야 하므로, HTTP POST 메서드를 이용하고, 성공 시에 201(Created) 응답 코드를 반환합니다.
앞서 만든 JsonTest 와 분리하기 위해 앞에서 작성했던 테스트는 UserAccountJsonTests 로 변경하고, UserAccountRequestTests 를 추가로 만들어줍니다.
1
2
3
4
5
6
7
8
9
10
11
12
13
14
15
16
17
18
19
20
21
22
23
24
25
26
27
28
29
30
31
32
33
package com.limvik.wantedpreonboardingbackend;

import com.limvik.wantedpreonboardingbackend.domain.UserAccount;
import org.junit.jupiter.api.Test;
import org.springframework.beans.factory.annotation.Autowired;
import org.springframework.boot.test.context.SpringBootTest;
import org.springframework.boot.test.web.client.TestRestTemplate;
import org.springframework.http.HttpStatus;
import org.springframework.http.ResponseEntity;

import java.time.LocalDateTime;

import static org.assertj.core.api.Assertions.assertThat;

@SpringBootTest(webEnvironment = SpringBootTest.WebEnvironment.RANDOM_PORT)
public class UserAccountRequestTests {
    @Autowired
    TestRestTemplate restTemplate;

    @Test
    void shouldCreateANewUserAccount() {
        UserAccount userAccount = new UserAccount(
                1L,
                "limvik@limvik.com",
                "password",
                LocalDateTime.of(2023, 8, 1, 0, 0, 0));

        ResponseEntity<Void> createResponse = restTemplate
                .postForEntity("/api/v1/user", userAccount, Void.class);

        assertThat(createResponse.getStatusCode()).isEqualTo(HttpStatus.CREATED);
    }
}
그리고 테스트를 실행해보면, Spring Security 덕분에 404(Not Found)가 아닌 401(Unauthorized) 가 응답으로 돌아옵니다.
1
2
3
4
UserAccountRequestTests > shouldCreateANewUserAccount() FAILED
    org.opentest4j.AssertionFailedError:
    expected: 201 CREATED
     but was: 401 UNAUTHORIZED
회원가입 엔드포인트 - Spring Security 설정하기
1
2
3
4
5
6
7
8
9
10
11
12
13
14
15
16
17
18
19
package com.limvik.wantedpreonboardingbackend.config;

import org.springframework.context.annotation.Bean;
import org.springframework.context.annotation.Configuration;
import org.springframework.security.config.annotation.web.builders.HttpSecurity;
import org.springframework.security.config.annotation.web.configuration.EnableWebSecurity;
import org.springframework.security.config.annotation.web.configurers.AbstractHttpConfigurer;
import org.springframework.security.web.SecurityFilterChain;

@EnableWebSecurity
@Configuration
public class SecurityConfig {
    @Bean
    public SecurityFilterChain userFilterChain(HttpSecurity http) throws Exception {
        return http.authorizeHttpRequests(auth -> {
            auth.requestMatchers("/api/v1/user").permitAll();})
                .csrf(AbstractHttpConfigurer::disable).build();
    }
}
회원가입을 누구나 할 수 있도록 /api/v1/user 경로를 모두에게 허용해주고, browser를 사용하는 것이 아니므로 csrf protection은 해제합니다. 관련 내용은 공식 문서(링크)를 참조합니다.
When should you use CSRF protection? Our recommendation is to use CSRF protection for any request that could be processed by a browser by normal users. If you are creating a service that is used only by non-browser clients, you likely want to disable CSRF protection.
그리고 다시 테스트를 해보면, 401(Unauthorized)가 아닌 403(Forbidden) 응답이 돌아옵니다.
1
2
3
4
UserAccountRequestTests > shouldCreateANewUserAccount() FAILED
    org.opentest4j.AssertionFailedError:
    expected: 201 CREATED
     but was: 403 FORBIDDEN
이제 201(Created) 응답을 받기 위해 엔드포인트를 만들어야 합니다.
회원가입 엔드포인트 - Controller
201 응답 시에는 새로 생성한 자원의 경로를 Location header 에 포함하여 보내야 하지만, 아직 회원 정보를 저장하는 코드는 작성하지 않았기 때문에, 임시로 URI.create("")로 작성하여 빈 경로를 보냅니다.
1
2
3
4
5
6
7
8
9
10
11
12
13
14
15
16
17
package com.limvik.wantedpreonboardingbackend.controller;

import org.springframework.http.ResponseEntity;
import org.springframework.web.bind.annotation.PostMapping;
import org.springframework.web.bind.annotation.RequestMapping;
import org.springframework.web.bind.annotation.RestController;

import java.net.URI;

@RestController
@RequestMapping("/api/v1/user")
public class UserController {
    @PostMapping
    private ResponseEntity<Void> createUser() {
        return ResponseEntity.created(URI.create("")).build();
    }
}
테스트를 수행하면 다음과 같이 정상적으로 PASSED가 시현되는 것을 볼 수 있습니다.
1
UserAccountRequestTests > shouldCreateANewUserAccount() PASSED
그런데 회원정보를 확인할 수 있어야 한다는 요구사항은 없었으므로, 현재 요구사항에 맞추려면 PUT 메서드와 204(No Content) 응답을 하는게 맞는 것 같습니다.
요구사항은 인원 선발을 위해 일부러 간소화한 것이므로, 추후 회원정보 확인 가능 여부는 선택권이 저에게 있으므로 방금 구현한 POST로 진행하겠습니다.
다음은 실제로 데이터를 저장해 보겠습니다.
회원가입 엔드포인트 - Repository, Service
습관적으로 Repository 부터 만들었다가, 부랴부랴 테스트를 만들었습니다. 그래도 테스트를 먼저 보겠습니다.
1
2
3
4
5
6
7
8
9
10
11
12
13
14
15
16
17
18
19
// 나머지 생략
@Autowired
UserRepository userRepository;

@Test
void shouldCreateANewUserAccount() {
    UserAccount userAccount = new UserAccount(
            1L,
            "limvik@limvik.com",
            "password",
            LocalDateTime.of(2023, 8, 1, 0, 0, 0));

    // 나머지 생략

    assertThat(userRepository.findById(1L).isPresent()).isEqualTo(true);
    assertThat(userRepository.findById(1L).get().getEmail()).isEqualTo(userAccount.getEmail());
    assertThat(userRepository.findById(1L).get().getPassword()).isEqualTo(userAccount.getPassword());
    assertThat(userRepository.findById(1L).get().getCreatedAt()).isNotEqualTo(userAccount.getCreatedAt());
}
마지막 createdAt은 isNotEqualTo 로 설정했는데, 그 이유는 UserAccount 객체의 createdAt 에 @CreationTimestamp annotation을 설정해놔서 값을 지정하더라도 INSERT 할 때의 시간이 저장되기 때문입니다.
1
2
@CreationTimestamp
private LocalDateTime createdAt;
당연하게도 실패하는 테스트의 결과는 굳이 작성하지 않겠습니다. 그리고 Repository는 Spring Data JPA 덕분에 간단하게 만들 수 있습니다.
1
2
3
4
5
6
7
8
package com.limvik.wantedpreonboardingbackend.repository;

import com.limvik.wantedpreonboardingbackend.domain.UserAccount;
import org.springframework.data.jpa.repository.JpaRepository;

public interface UserRepository extends JpaRepository<UserAccount, Long> {

}
다음으로 Service 를 작성합니다.
1
2
3
4
5
6
7
8
9
10
11
12
13
14
15
16
17
18
19
package com.limvik.wantedpreonboardingbackend.service;

import com.limvik.wantedpreonboardingbackend.domain.UserAccount;
import com.limvik.wantedpreonboardingbackend.repository.UserRepository;
import lombok.RequiredArgsConstructor;
import org.springframework.stereotype.Service;
import org.springframework.transaction.annotation.Transactional;

@RequiredArgsConstructor
@Service
public class UserService {
    private final UserRepository userRepository;

    @Transactional
    public UserAccount createUser(UserAccount newUserAccount) {
        return userRepository.save(newUserAccount);
    }
}
다음으로 다시 Controller 로 가서 실제 저장을 하고, location 을 헤더에 포함하도록 수정합니다.
1
2
3
4
5
6
7
8
9
10
11
12
13
14
15
16
17
@RequiredArgsConstructor
@RestController
@RequestMapping("/api/v1/user")
public class UserController {
    private final UserService userService;

    @PostMapping
    private ResponseEntity<Void> createUser(@RequestBody UserAccount newUserAccount,
                                            UriComponentsBuilder ucb) {
        UserAccount savedUserAccount = userService.createUser(newUserAccount);
        URI locationOfNewUserAccount = ucb
                .path("/api/v1/user/{id}")
                .buildAndExpand(savedUserAccount.getId())
                .toUri();
        return ResponseEntity.created(locationOfNewUserAccount).build();
    }
}
실행 전에 Properties 를 설정해 줍니다.
1
2
3
4
5
spring.jpa.show-sql=true
spring.jpa.properties.hibernate.format_sql=true
spring.jpa.properties.hibernate.jdbc.time_zone=UTC
spring.jpa.generate-ddl=true
spring.jpa.hibernate.ddl-auto=create
마지막으로 다시 테스트를 하면 PASSED를 볼 수 있습니다.
1
UserAccountRequestTests > shouldCreateANewUserAccount() PASSED
그리고 유효성 검사로 넘어가려고 했는데…! 비밀번호 암호화를 안했습니다.
비밀번호 암호화
테스트 시 비밀번호는 PasswordEncoder 를 통해서 비교하도록 수정합니다.
1
2
3
4
5
@Autowired
PasswordEncoder passwordEncoder;

assertThat(passwordEncoder.matches(userAccount.getPassword(), userRepository.findById(1L).get().getPassword()))
        .isEqualTo(true);
당연하게도 오류가 발생합니다. 그래서 SecurityConfig 에서 PasswordEncoder를 이전에 사용하기로 했던 BCryptPasswordEncoder로 설정합니다.
1
2
3
4
5
6
7
8
9
10
@EnableWebSecurity
@Configuration
public class SecurityConfig {
    // SecurityFilterChain 생략

    @Bean
    public PasswordEncoder passwordEncoder() {
        return new BCryptPasswordEncoder();
    }
}
마지막으로 Service 에서 저장하기 전에 암호화를 해줍니다.
1
2
3
4
5
6
7
8
9
10
11
12
@RequiredArgsConstructor
@Service
public class UserService {
    private final UserRepository userRepository;
    private final PasswordEncoder passwordEncoder;

    @Transactional
    public UserAccount createUser(UserAccount newUserAccount) {
        newUserAccount.setPassword(passwordEncoder.encode(newUserAccount.getPassword()));
        return userRepository.save(newUserAccount);
    }
}
이후 다시 테스트를 하면 이상 없이 PASSED 되는 것을 볼 수 있습니다.
1
UserAccountRequestTests > shouldCreateANewUserAccount() PASSED
유효성 검사
유효성 검사를 그냥 단순하게 하면 Controller 에 로직을 포함할 수 있겠지만, Validation 라이브러리를 사용해보고 싶었습니다.
Validation 을 이용해서 유효성 검사가 통과하지 못하는 경우를 찾아보니(링크), 400(Bad Request) 응답을 반환합니다.
이를 따라서 테스트도 Bad Request 를 반환하는지 확인하도록 작성합니다. 테스트용 데이터는 사용자의 이메일 주소에 @가 없고, 8글자 미만이 되도록 작성합니다.
1
2
3
4
5
6
7
8
9
10
11
12
13
14
@Test
void shouldNotCreateANewUserAccountIfNotValid() {
    UserAccount userAccount = new UserAccount(
            1L,
            "limvik",
            "pass",
            LocalDateTime.of(2023, 8, 1, 0, 0, 0));

    ResponseEntity<Void> createResponse = restTemplate
        .postForEntity("/api/v1/user", userAccount, Void.class);

    assertThat(createResponse.getStatusCode()).isEqualTo(HttpStatus.BAD_REQUEST);
    assertThat(userRepository.findById(1L).isPresent()).isEqualTo(false);
}
당연하게도 저장이 잘 돼서, 테스트를 통과하지 못합니다.
1
2
expected: 400 BAD_REQUEST
 but was: 201 CREATED
그러면 유효성 검사를 수행하는 annotation을 다음과 같이 추가해줍니다. email 을 검사하는 전용 annotation이 존재하지만, @ 포함여부를 검사하는 것 외에는 검사하지 말라고 했으니 정규표현식을 이용하여 @ 포함여부를 확인합니다.
1
2
3
4
5
6
7
8
9
10
11
12
13
14
15
16
17
18
19
20
@AllArgsConstructor
@NoArgsConstructor
@Data
@Entity
public class UserAccount {
    @Id
    @GeneratedValue(strategy = GenerationType.IDENTITY)
    private Long id;

    @Column(nullable = false, unique = true)
    @Pattern(regexp = "^[^@]*@[^@]*$", message = "올바른 이메일 형식이 아닙니다.")
    private String email;

    @Column(nullable = false)
    @Length(min = 8, message = "비밀번호는 최소 8글자 이상입니다.")
    private String password;

    @CreationTimestamp
    private LocalDateTime createdAt;
}
그리고 Controller 에서는 유효성 검사를 수행하도록, @Valid annotation을 추가해줍니다.
1
private ResponseEntity<Void> createUser(@Valid @RequestBody UserAccount newUserAccount,
그런데 테스트를 수행하면, 기대했던 400이 아닌 403 응답이 옵니다.
1
2
3
4
UserAccountRequestTests > shouldNotCreateANewUserAccountIfNotValid() FAILED
    org.opentest4j.AssertionFailedError:
    expected: 400 BAD_REQUEST
     but was: 403 FORBIDDEN
403이면 역시나 Spring Security 때문입니다. 보안적인 측면에서 구체적으로 오류를 알려주는 경우 공격자에게 공격 정보를 제공하게 될 수 있기 때문에, 숨기는 것이 좋다고 보안을 공부할 때 본적이 있습니다. Spring Security 에서도 공격자에게 정보를 제공하지 않기 위해 특별한 지정이 없으면 403으로 처리한다고 합니다.
하지만 지금은 정확하게 400 응답과 함께 400 응답을 한 이유를 클라이언트에게 알려줘야 하므로, 응답을 수행할 수 있도록 수정합니다.
참고 했던 Validation 자료(링크)에 있는 예제가 동작을 안해서 GPT와 콜라보로 유효성 검사 실패 시에 동작하는 Exception Handler 를 별도로 정의했습니다.
1
2
3
4
5
6
7
8
9
10
11
12
13
14
15
16
17
18
19
20
21
22
23
24
25
26
27
28
29
30
31
32
33
34
35
36
package com.limvik.wantedpreonboardingbackend.exception;

import org.springframework.http.HttpStatus;
import org.springframework.http.ResponseEntity;
import org.springframework.web.bind.MethodArgumentNotValidException;
import org.springframework.web.bind.annotation.ExceptionHandler;
import org.springframework.web.bind.annotation.ResponseStatus;
import org.springframework.web.bind.annotation.RestControllerAdvice;
import org.springframework.validation.FieldError;

import java.time.LocalDateTime;
import java.util.LinkedHashMap;
import java.util.List;
import java.util.Map;
import java.util.stream.Collectors;

@RestControllerAdvice
public class CustomExceptionHandler {
    @ExceptionHandler(MethodArgumentNotValidException.class)
    @ResponseStatus(HttpStatus.BAD_REQUEST)
    public ResponseEntity<Object> handleValidationException(MethodArgumentNotValidException ex) {

        Map<String, Object> responseBody = new LinkedHashMap<>();
        responseBody.put("timestamp", LocalDateTime.now().toString());
        responseBody.put("status", ex.getStatusCode().value());

        List<String> errors = ex.getBindingResult()
                .getFieldErrors()
                .stream()
                .map(FieldError::getDefaultMessage)
                .collect(Collectors.toList());

        responseBody.put("errors", errors);
        return ResponseEntity.badRequest().body(responseBody);
    }
}
다시 테스트를 해보면, 이번에는 다음 테스트를 통과하지 못하는 것을 볼 수 있습니다.
1
2
3
4
UserAccountRequestTests > shouldNotCreateANewUserAccountIfNotValid() FAILED
    org.opentest4j.AssertionFailedError:
    expected: false
     but was: true
다른 테스트에서도 사용자를 생성하므로, 1L 아이디를 갖는 사용자가 존재하기 때문입니다.
그래서 @AfterEach annotion을 적용한 메서드에 데이터베이스의 데이터를 모두 지우도록 작성합니다.
1
2
3
4
@AfterEach
void tearDown() {
    userRepository.deleteAll();
}
그러면 이상 없이 테스트를 통과하는 것을 볼 수 있습니다.
1
UserAccountRequestTests > shouldNotCreateANewUserAccountIfNotValid() PASSED
이제 첫 번째 과제에 대한 기능 구현을 완료하였습니다.
다시 살펴보면서 리팩터링을 합니다.
리팩터링1. 오류 수정
테스트할 때는 이상이 없었는데, 어플리케이션을 실행하니 Spring Security 관련 코드에서 오류가 발생합니다.
1
2
3
4
Caused by: org.springframework.beans.factory.BeanCreationException: Error creating bean with name 'userFilterChain' defined in class path resource [com/limvik/wantedpreonboardingbackend/config/SecurityConfig.class]:
Failed to instantiate [org.springframework.security.web.SecurityFilterChain]:
Factory method 'userFilterChain' threw exception with message:
This method cannot decide whether these patterns are Spring MVC patterns or not. If this endpoint is a Spring MVC endpoint, please use requestMatchers(MvcRequestMatcher); otherwise, please use requestMatchers(AntPathRequestMatcher).
Spring MVC patterns 여부가 굉장히 중요한 것 같습니다. 아직 지식이 부족해서 자세한 원인은 알 수 없으나, 제시해준 것 중에 MVC pattern 을 사용하고 있지는 않으므로, AntPathRequestMatcher 를 사용하여 문제를 해결합니다.
1
2
3
4
5
6
7
8
9
10
11
12
13
14
15
16
@EnableWebSecurity
@Configuration
public class SecurityConfig {
    @Bean
    public SecurityFilterChain userFilterChain(HttpSecurity http) throws Exception {
        return http.authorizeHttpRequests(auth -> {
            auth.requestMatchers(new AntPathRequestMatcher("/api/v1/user")).permitAll();})
                .csrf(AbstractHttpConfigurer::disable)
                .build();
    }

    @Bean
    public PasswordEncoder passwordEncoder() {
        return new BCryptPasswordEncoder();
    }
}
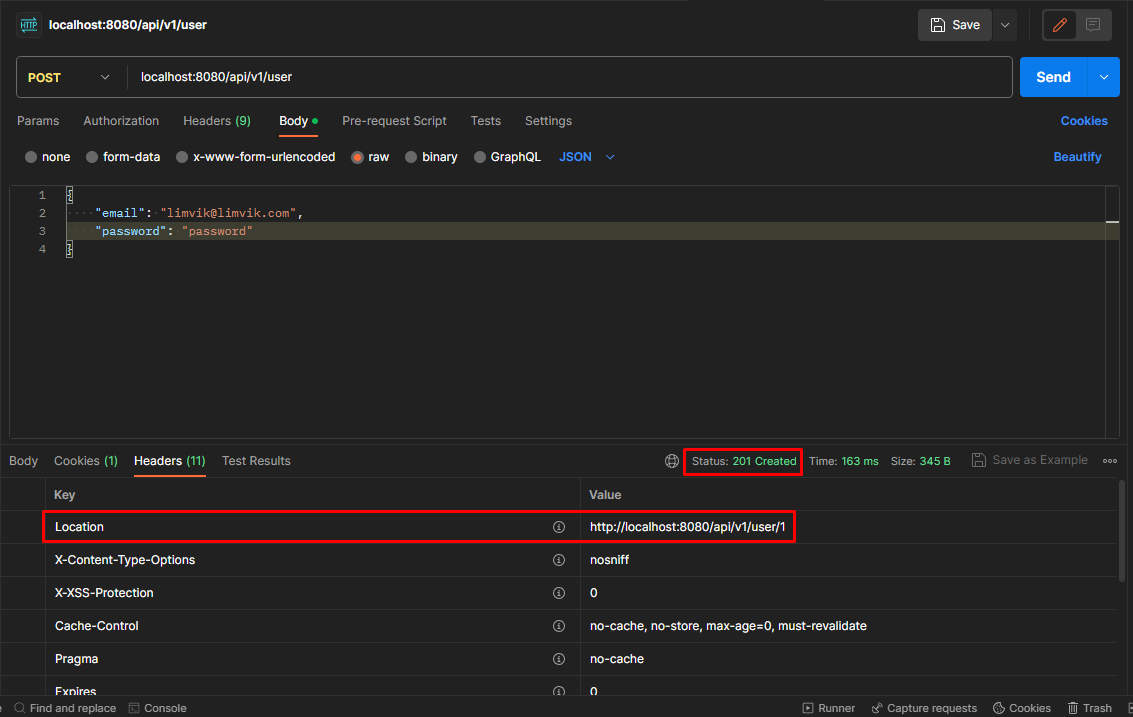
그리고 postman을 이용해 요청을 해보면, 정상적으로 결과가 나오는 것을 볼 수 있습니다.
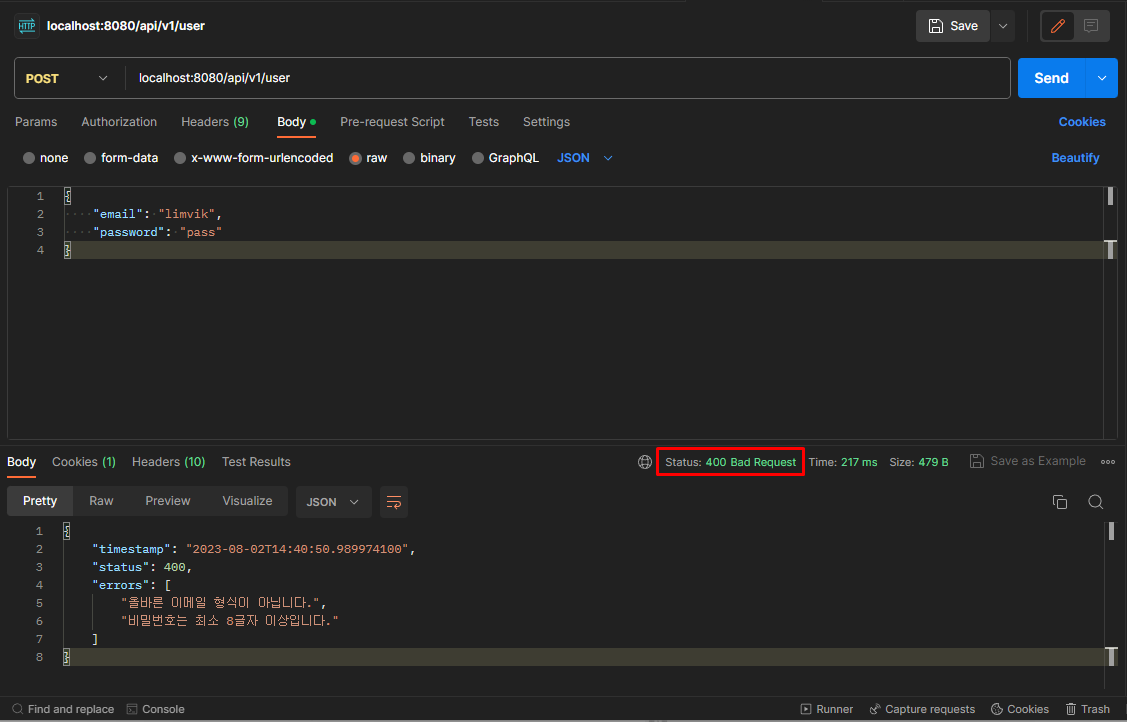
정상적인 요청도 한 번 보겠습니다.
json 응답도 테스트를 작성해야 할 것 같은데… 일단은 간단한 것 위주로 리팩터링을 수행합니다.
리팩터링2. Controller
Controller 는 요청을 받아서 처리하는 곳이다 보니 메서드 이름을 기능의 이름과 더 가깝게 createUser에서 signUp 으로 변경하고, (클린 코드에서 본 거는 있어서) URI 를 만드는 것은 추상화 수준이 낮고, 보기 안좋기 때문에 private 메서드로 분리합니다.
1
2
3
4
5
6
7
8
9
10
11
12
13
14
15
16
17
18
19
20
21
22
@RequiredArgsConstructor
@RestController
@RequestMapping("/api/v1/user")
public class UserController {
    private final UserService userService;

    @PostMapping
    private ResponseEntity<Void> signUp(@Valid @RequestBody UserAccount newUserAccount,
                                        UriComponentsBuilder ucb) {
        UserAccount savedUserAccount = userService.createUser(newUserAccount);
        URI locationOfNewUserAccount = buildLocationOfNewUserAccountUri(savedUserAccount, ucb);
        return ResponseEntity.created(locationOfNewUserAccount).build();
    }

    private URI buildLocationOfNewUserAccountUri(UserAccount savedUserAccount,
                                                 UriComponentsBuilder ucb) {
        return ucb
                .path("/api/v1/user/{id}")
                .buildAndExpand(savedUserAccount.getId())
                .toUri();
    }
}
리팩터링3. 유효성 검사 메시지 관리
메시지 개수가 몇 개 안되지만 하드코딩된 메시지를 없애고, i18n을 위한 준비를 미리 경험해볼 겸 메시지 관리 파일을 별도로 만들어 봅니다.
먼저 ValidationMessages.properties 파일을 만들고, 내용을 추가합니다. 파일 이름을 자동으로 인식하기 때문에 이름이 틀리면 안됩니다.
1
2
user.email.pattern=올바른 이메일 형식이 아닙니다.
user.password.length=비밀번호는 최소 {min}글자 이상이어야 합니다.
Validation annotation의 메시지를 수정합니다.
1
2
3
4
5
6
@Pattern(regexp = "^[^@]*@[^@]*$", message = "{user.email.pattern}")
private String email;

@Column(nullable = false)
@Length(min = 8, message = "{user.password.length}")
private String password;
리팩터링4. UserAccount 클래스 이름 변경
처음에 User로 했다가 UserAccount로 변경했습니다. Spring 에서 기본적으로 지원하는 User 클래스가 있어서, 혼란을 방지하려고 바꿨는데, 더 혼란스러운거 같습니다.
리팩터링5. 테스트 개선
사용자를 생성하는 테스트에서 assertThat 마다 사용자를 데이터베이스에서 불러오는 것은 비효율적인 것 같아서 수정했습니다.
1
2
3
4
assertThat(userRepository.findById(1L).isPresent()).isEqualTo(true);
assertThat(userRepository.findById(1L).get().getEmail()).isEqualTo(user.getEmail());
assertThat(passwordEncoder.matches(user.getPassword(), userRepository.findById(1L).get().getPassword())).isEqualTo(true);
assertThat(userRepository.findById(1L).get().getCreatedAt()).isNotEqualTo(user.getCreatedAt());
수정 결과
1
2
3
4
5
6
assertThat(userRepository.findById(1L).isPresent()).isEqualTo(true);

var createdUser = userRepository.findById(1L).get();
assertThat(createdUser.getEmail()).isEqualTo(user.getEmail());
assertThat(passwordEncoder.matches(user.getPassword(), createdUser.getPassword())).isEqualTo(true);
assertThat(createdUser.getCreatedAt()).isNotEqualTo(user.getCreatedAt());
리팩터링6. 추가 테스트
하는 김에 그냥 테스트를 추가 하려고 합니다. 유효성 검사를 통과하지 못한 경우에 대한 테스트를 추가합니다.
1
2
3
4
5
6
7
8
9
10
11
12
13
14
15
16
17
18
19
20
21
22
23
24
25
26
27
28
29
30
31
32
@SpringBootTest(webEnvironment = SpringBootTest.WebEnvironment.RANDOM_PORT)
@TestPropertySource(locations = "classpath:ValidationMessages.properties")
public class UserRequestTests {
    // 다른 속성 생략

    @Value("${user.email.pattern}")
    String emailValidationMessage;

    @Value("${user.password.length}")
    String passwordValidationMessage;

    // 다른 테스트 생략

    @Test
    void shouldNotCreateANewUserAccountIfNotValid() {
        User user = new User(
                1L,
                "limvik",
                "pass",
                LocalDateTime.of(2023, 8, 1, 0, 0, 0));

        ResponseEntity<String> createResponse = restTemplate
                .postForEntity("/api/v1/user", user, String.class);;
        assertThat(createResponse.getStatusCode()).isEqualTo(HttpStatus.BAD_REQUEST);
        assertThat(userRepository.findById(1L).isPresent()).isEqualTo(false);

        DocumentContext documentContext = JsonPath.parse(createResponse.getBody());
        assertThat((JSONArray)documentContext.read("$..errors"))
                .contains(emailValidationMessage, passwordValidationMessage);

    }
}
몇 줄 안되는 테스트 코드 추가하는데 처음 써보다보니 오류가 많아서 고생했습니다. 또 다른 문제는 TestPropertySource 로 가져온 값에서 한글이 깨져버립니다.
1
2
3
4
5
6
7
8
9
java.lang.AssertionError:
Expecting JSONArray:
  [["올바른 이메일 형식이 아닙니다.", "비밀번호는 최소 8글자 이상이어야 합니다."]]
to contain:
  ["ì¬ë°ë¥¸ ì´ë©ì¼ íìì´ ìëëë¤.",
    "ë¹ë°ë²í¸ë ìµì {min}ê¸ì ì´ìì´ì´ì¼ í©ëë¤."]
but could not find the following element(s):
  ["ì¬ë°ë¥¸ ì´ë©ì¼ íìì´ ìëëë¤.",
    "ë¹ë°ë²í¸ë ìµì {min}ê¸ì ì´ìì´ì´ì¼ í©ëë¤."]
@TestPropertySource annotation을 잘 이해하지 못해서 그런건지는 모르겠지만, 근본적인 원인을 찾을 수 없어, decoding 했다가 다시 utf-8 으로 encoding 해버렸습니다. 그리고 Environment 로 가져오는 것도 괜찮은 것 같아서 사용해 봤습니다.
1
2
3
4
5
6
7
8
9
10
11
12
13
14
15
16
17
18
19
20
21
22
23
24
25
26
27
28
29
30
31
32
import org.springframework.core.env.Environment;

@Autowired
Environment env;

@Test
void shouldNotCreateANewUserAccountIfNotValid() {
    User user = new User(
            1L,
            "limvik",
            "pass",
            LocalDateTime.of(2023, 8, 1, 0, 0, 0));

    ResponseEntity<String> createResponse = restTemplate
            .postForEntity("/api/v1/user", user, String.class);;
    assertThat(createResponse.getStatusCode()).isEqualTo(HttpStatus.BAD_REQUEST);
    assertThat(userRepository.findById(1L).isPresent()).isEqualTo(false);

    DocumentContext documentContext = JsonPath.parse(createResponse.getBody());
    assertThat(((JSONArray)documentContext.read("$..errors")).toJSONString())
            .contains(getEmailValidationMessage(), getPasswordValidationMessage());

}

private String getEmailValidationMessage() {
    return new String(env.getProperty("user.email.pattern").getBytes(StandardCharsets.ISO_8859_1), StandardCharsets.UTF_8);
}

private String getPasswordValidationMessage() {
    return new String(env.getProperty("user.password.length").getBytes(StandardCharsets.ISO_8859_1),
            StandardCharsets.UTF_8).replace("{min}", "8");
}
테스트 성공…!
1
UserRequestTests > shouldNotCreateANewUserAccountIfNotValid() PASSED
다음 JWT 라는 큰 고비가 남아있기 때문에, 이쯤하고 다음으로 넘어가겠습니다.
Outro
만들면서 어떻게 만들었었는지 글로 남겨볼까 했는데, 잘 하고 있는 짓인지 모르겠습니다. 글 쓰느라 시간이 오래 걸리는건지, 다른 이유로 시간이 오래 걸리는건지…
일단은 글로 쓰는걸 시작한 김에 하는데까지 해보기로 하고, 다음 글에서는 다음 과제인 로그인 과제를 하면서 기록으로 남겨보겠습니다.
궁금했지만 그냥 넘어간 것들
나중에라도 찾아보고 정리할겸 진행하면서 궁금했는데, 일단 넘어갔던 목록을 남겨둡니다.
- 왜 일반적인 VARCHAR의 길이는 255인가?
- 동일한 사용자가 동일한 게시글을 읽을 때 세션이 없다면, 서버에서는 조회수를 어떻게 처리할까?
- MySQL TIMESTAMP 속성과 DATETIME 속성의 차이점은? (공식 문서 링크)
- @Id, @Transactional은 Jakarta와 Spring 에 각각 있는데 둘의 차이점은?
- Spring Security 에서 URL 패턴 지정 시 Spring MVC pattern 여부가 중요한 이유는?
- @TestPropertySource 로 불러온 property 값의 인코딩이 바뀌는 이유는?
참고자료
- 데이터베이스의 Timestamp 속성을 사용하려면, JPA 사용 시 Java에서는 어떤 자료형을 사용해야 하나? https://vladmihalcea.com/date-timestamp-jpa-hibernate/
- JPA에서 생성 일시와 갱신 일시를 자동으로 생성하게 하려면? https://jeongkyun-it.tistory.com/178
- @TestPropertySource 사용 방법은? https://www.concretepage.com/spring-5/testpropertysource-example-spring-test